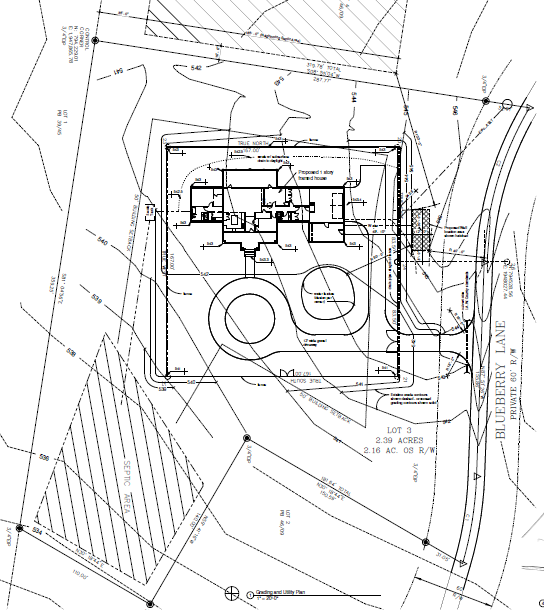
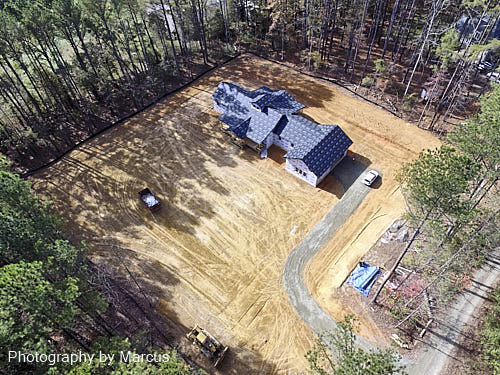
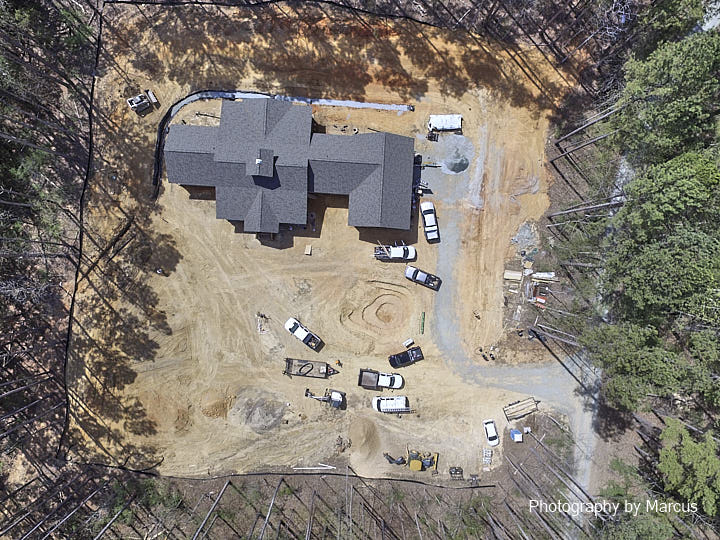
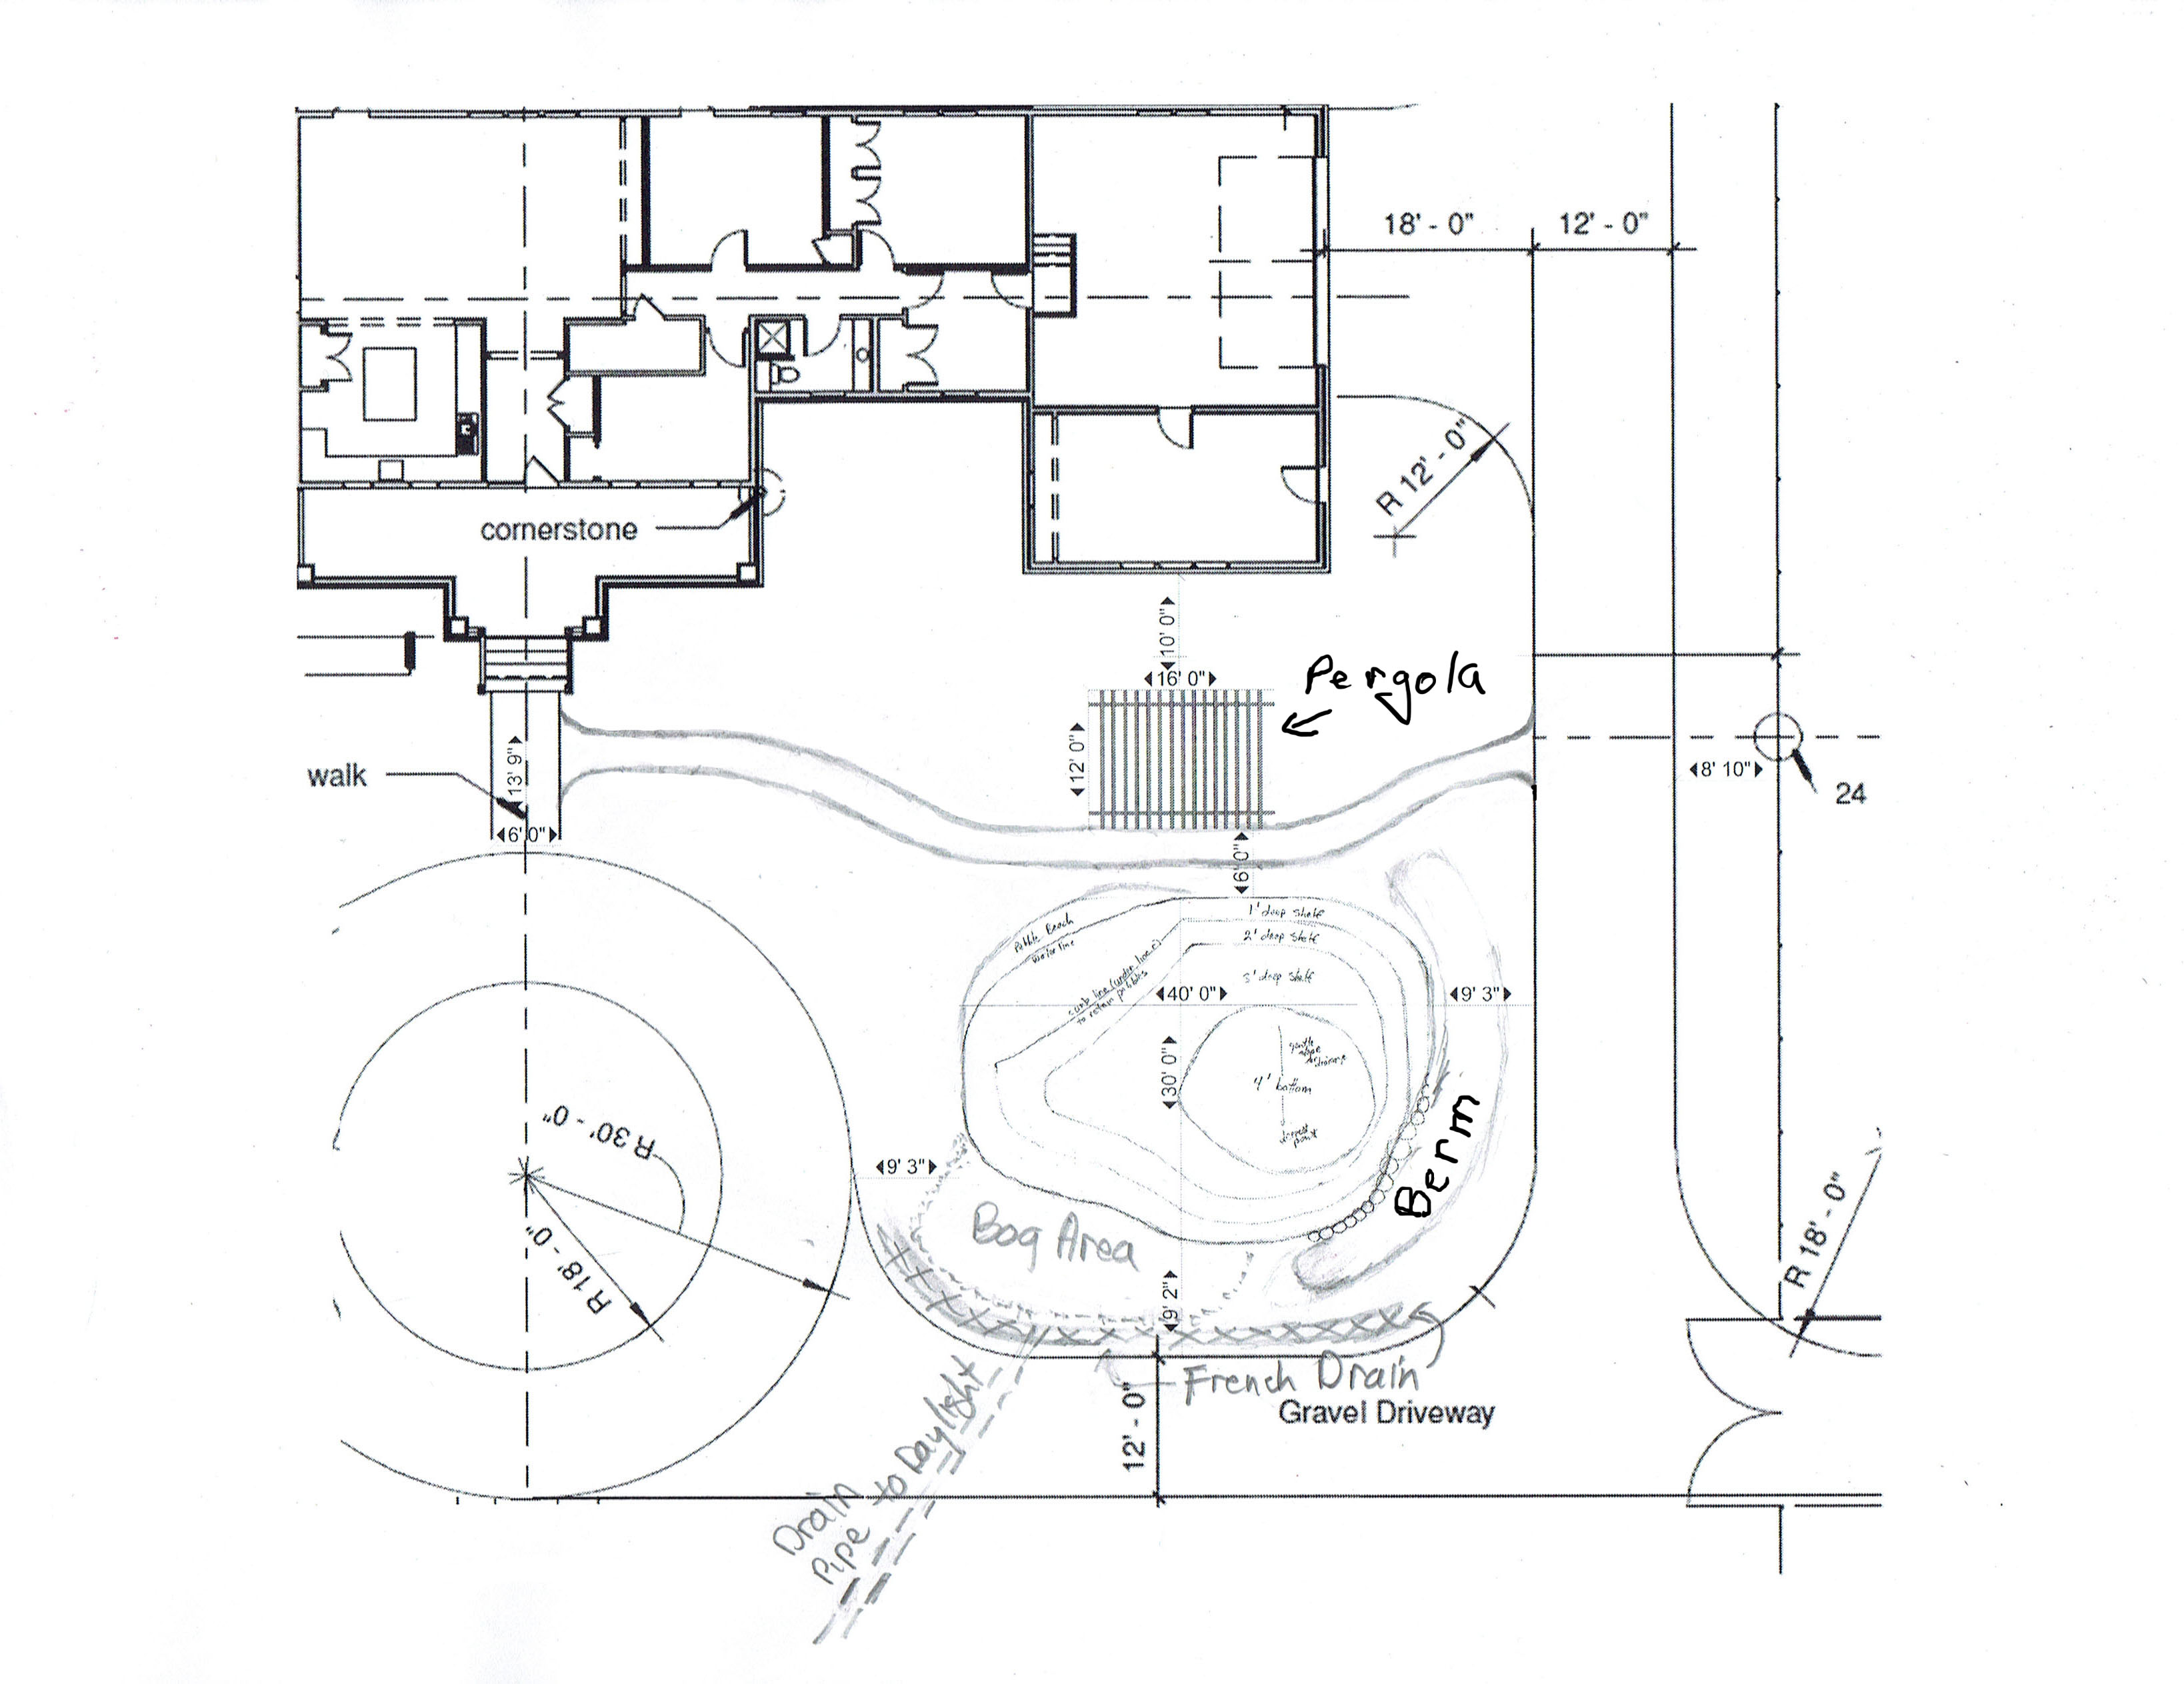
The Site Plan
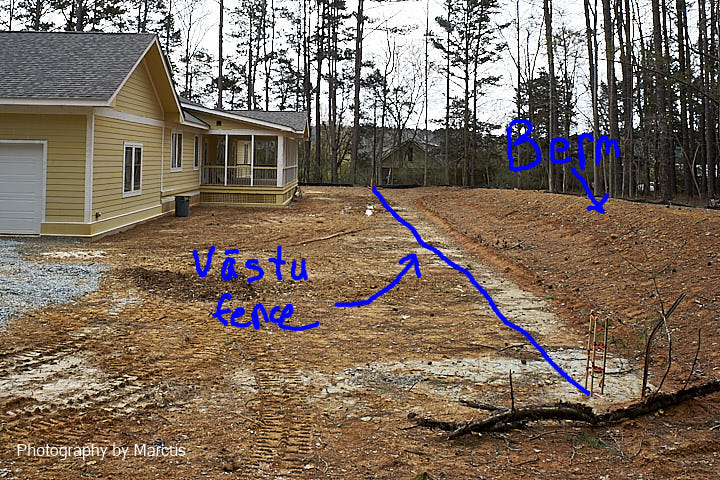
Henry Dearborn, my Vāstu architect, took pains with the site plan to achieve the required final slope through a balanced cut and fill approach to the initial excavation. As it turned out, we have some extra soil which we were able to use to create a privacy berm on the west side. We expect to be able to bolster it with additional soil when we excavate for the pond.
Before construction, the land sloped gently to the southeast. For Vāstu purposes, the final slope within the area bounded by the Vāstu fence will need to be from west to east. The drop is only 2 feet. Given the relative flatness of the property, we had to give a lot of attention to drainage.
Grading the Vāstu
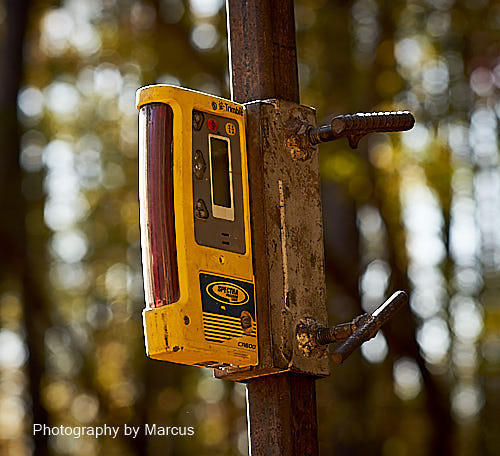
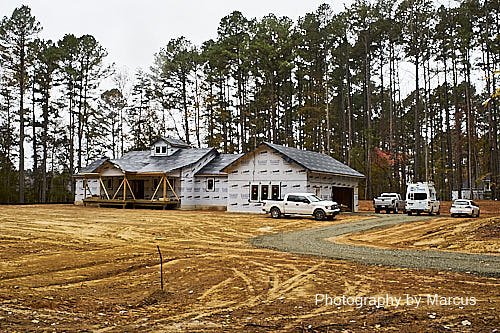
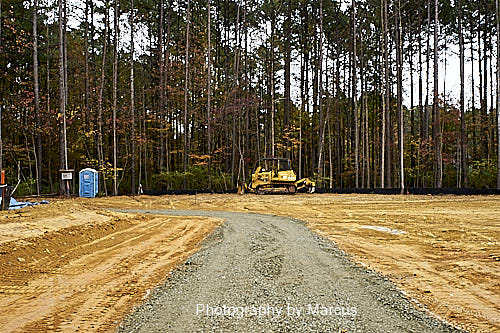
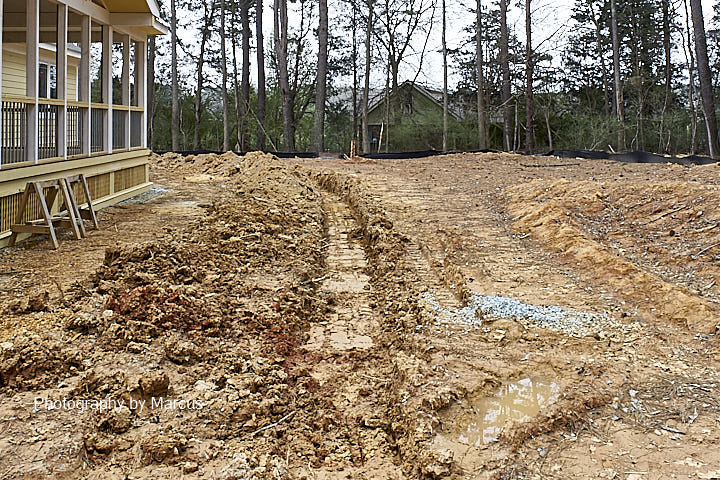
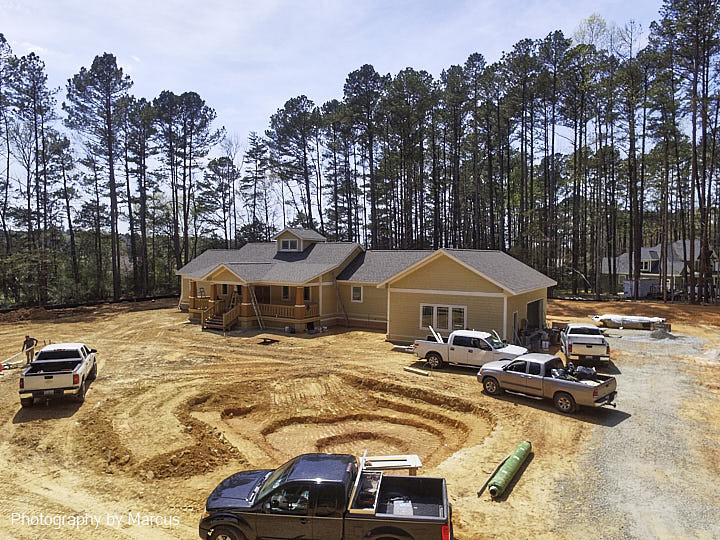
Vernon has managed the grading in stages from the time the perimeter drains were completed. On November 3, he orchestrated additional work to approximate the final grade across the Vāstu. The tricky part was blending the driveway. Here are some photos of the machines in action and some details of the primary bulldozer, which was an amazing machine matched only by the skill of its operator. It was so big and powerful that a little bump against the porches could have brought them down! A laser level simplified the task of maintaining the correct grading. Without it, the operator would have needed a helper to walk in front.
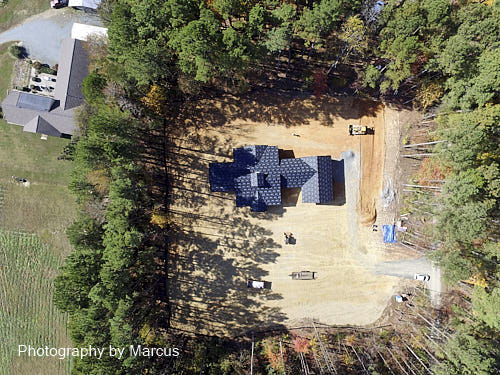


Vernon orchestrated the completion of the working grading on November 6 and redid the temporary driveway just ahead of the heavy rains that fell the next evening. The transition to the entrance drive works well. Later we’ll deal with the circle drive to the front door and perhaps a swale to manage drainage off the slope from Blueberry Lane on the north. Incidentally, you can see the awning windows have been installed on the cupola.
Final Site Work
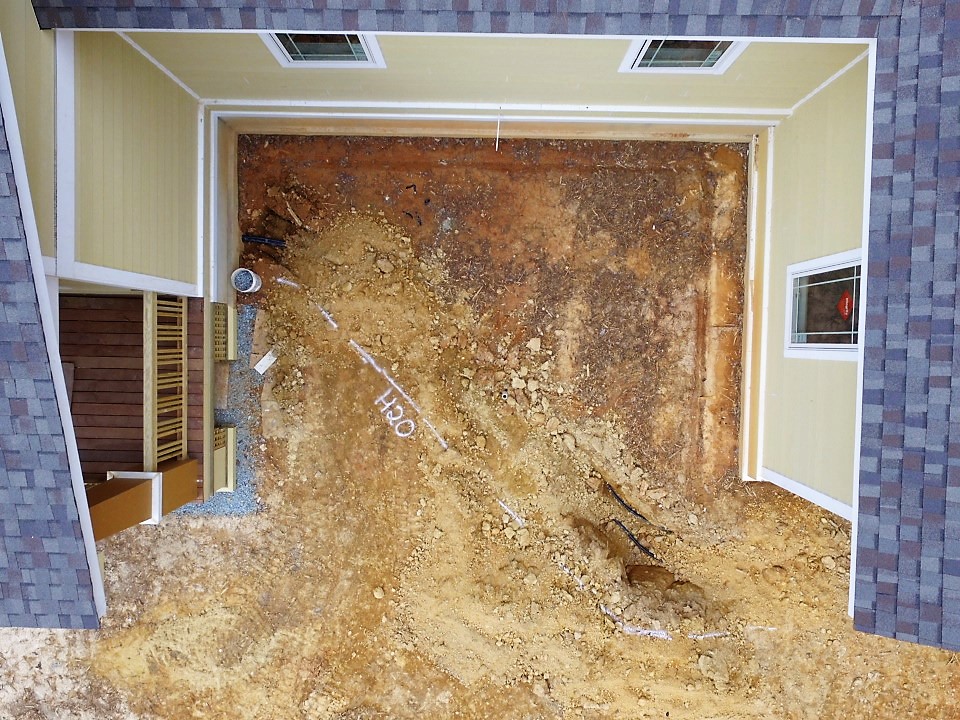
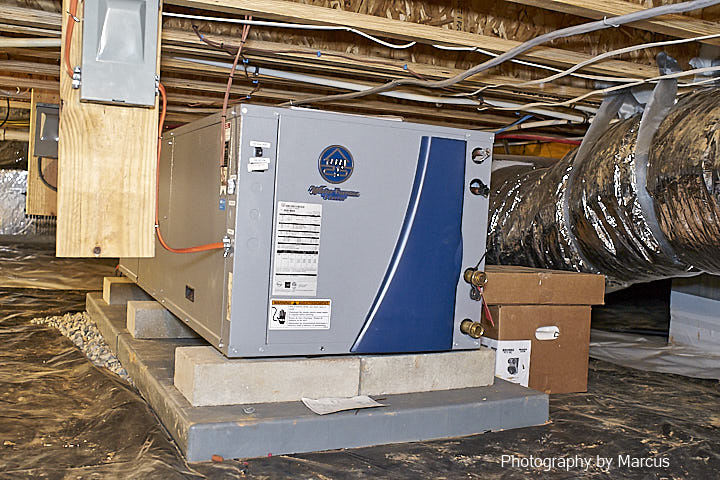
We experience a long delay in refining the site work due to a wet winter. The machinery required can get bogged down in mud. We were also waiting to complete the trenching for the geothermal and water lines. The geothermal well drillers finally appeared on March 6 and only took a couple of days to put a pair of wells down 180 feet.
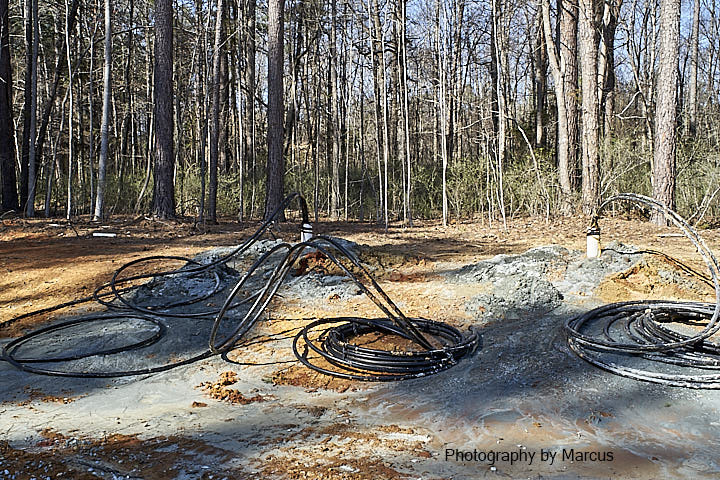
They returned the following week to inject the grout. I’m sorry I wasn’t there to grab some photos. Vernon said they used the well water to mix the grout in a large tank. They then pumped it down each well under pressure. Finally, they pulled out the temporary PVC casing—30 feet long!
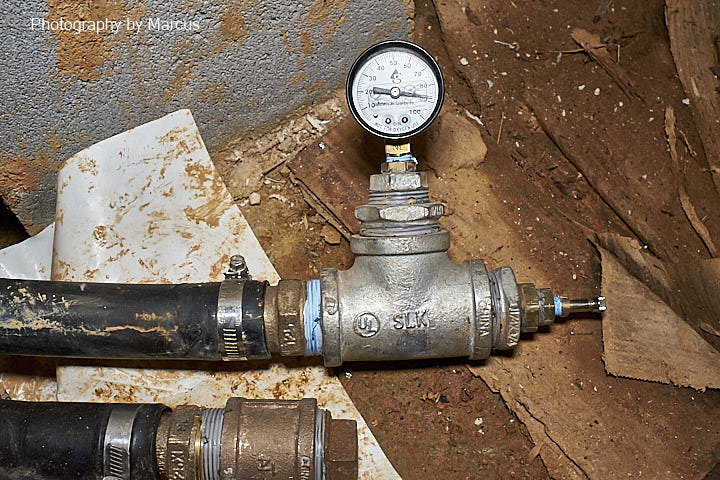
Then they connected the lines together, trenched them to the prepared entrance on the north side of the main structure and ran a pressure test pending inspection.
Electrical Trenching
The landscaper also dug trenches for electrical conduit to serve lamp posts in the center of the circle drive and the north gate as well as outlets that I wanted at the gates and pergola.

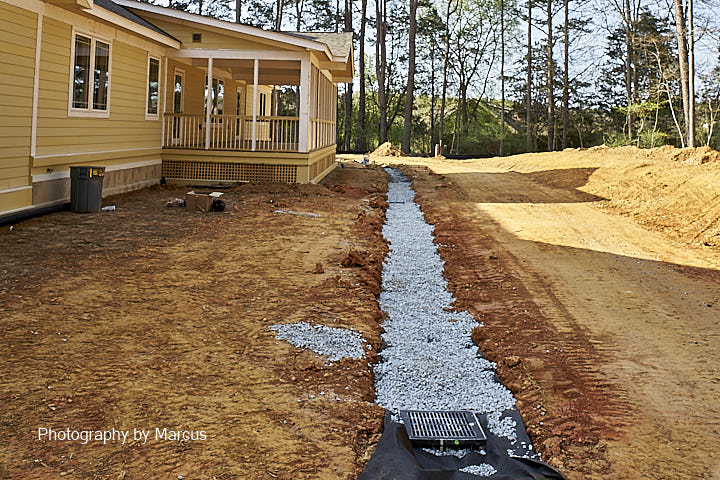
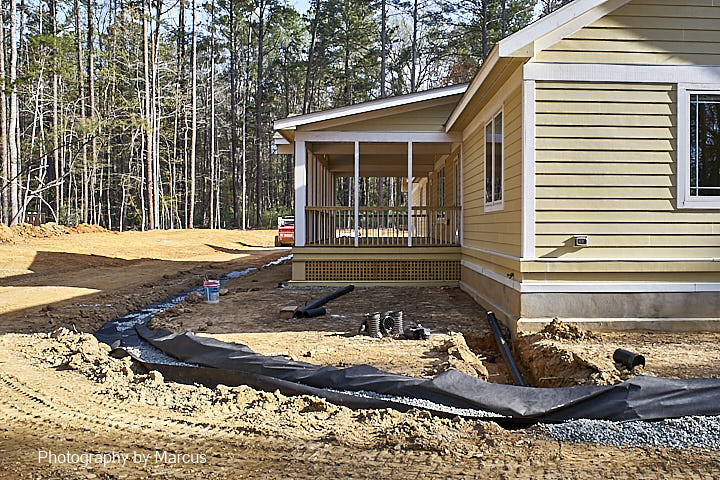
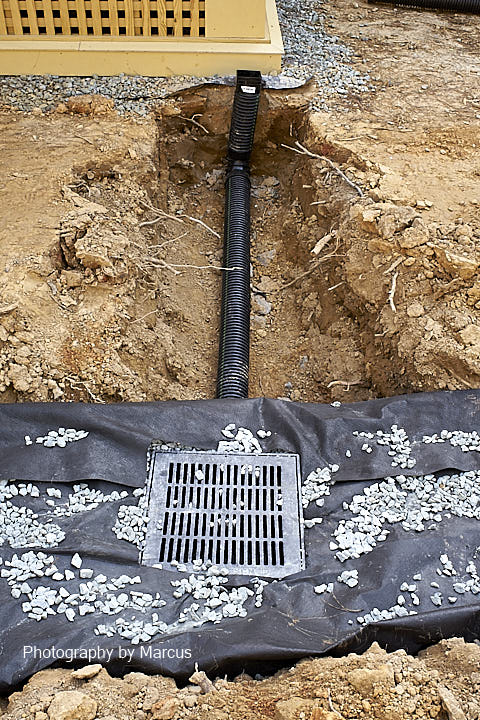
Drainage from the West
The relative flatness of the lot and the modification we made for Vāstu purposes posed some challenges for drainage. The overall plan called to move water coming from the west side to the south and that coming from the north to the east and south. This photo shows the west side where we’re developing a berm that we’ll plant with green giant arborvitae to provide privacy. Closer to the home and inside the Vāstu fence, Vernon planned out a swale to drain both surface water and roof run-off to the south to terminate in the same area as the crawlspace and foundation perimeter drains.

Drainage from the North


Erosion Control
The Orange County building department monitors the builder’s erosion control plan. Going forward, I wanted to improve the quality of the soil in preparation for future gardening and landscaping. I sought advice from my friends and the NC Botanical Garden. I wanted to protect my land from contamination from both weeds and toxic chemicals. Larry Newlin of Peaceful River Farm suggested that I plant a cover crop of iron clay peas and millet on leaf mulch. I loved the strategy. Both crops are prolific, easy to grow and draught resistant. All I needed to do was throw down the seed before a soaking rain.
Leaf mulch is among the cleanest, most available and least expensive soil amendments. I needed 80 cubic yards to cover my property two inches deep.
As much as the flatness of the lot posed a challenge for drainage, it also created risk for erosion at the margins. I didn’t appreciate this until a few heavy thunderstorms revealed the vulnerability. If my cover crop had been established, it might not have been so bad. Unfortunately, the rains washed away both mulch and seed in limited patches, especially to the north of the Vāstu fence. They also revealed the need for drainage for the circle drive.
I considered getting coconut erosion control matting like I’d used successfully in Connecticut, but it was too expensive for the scope of the problem. After some trial and error, I found that wood chips left over from the septic system installation were perfect. They were easy to distribute, attractive to worms, and as good as leaf mulch in fostering cover crop germination.
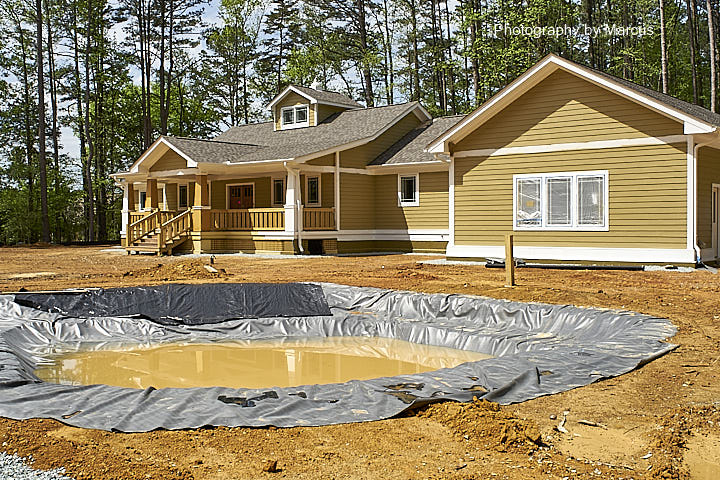
Pond
A water feature in the northeast quadrant of the Vāstu adds an auspicious influence. Having experienced 20+ years of joy from water gardening, I wanted to create a pond on the property. I hoped it would be large enough to be self-sustaining and provide a home to frogs and maybe some goldfish. Vernon suggested we direct some of the roof runoff there. I embraced that idea after assuring myself that it wouldn’t have unintended consequences.
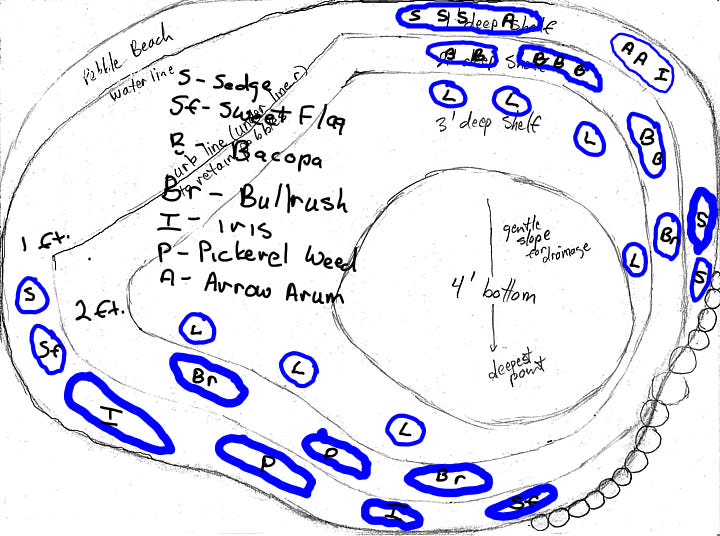
I designed the pond to be as naturalistic as possible in shape. That meant adding some variation around the perimeter to channel any storm water over-flow into a bog area.

Pond Liner
I did a lot of research on pond design and construction, both at the library and on the net. EPDM rubber has been the favorite due to its durability and flexibility. Reinforced polyethylene (RPE) is now favored in many applications due to its puncture resistance and light weight. The reinforcement layer helps to protect it from UV light which rapidly destroys unprotected polyethylene. If EPDM is correctly installed, it has a long life expectancy. RPE is only good for about 20 years unless it is covered by earth or water. RPE is somewhat more expensive.
Even though rocks or soil will cover the top surface of my pond liner when it’s completed, I was concerned about the 6″ band between the water line and the top. Here in NC, we tend to have hot, dry summers. This means the water level will likely fall and expose more liner to UV light. Since I’m building with the long-term view, I didn’t want to take a chance on leaving behind a messy repair problem for my home’s heirs. Moreover, my builder and landscaper both have had good experience with EPDM, so I went with it. It was installed on April 23 right before a heavy rain. This photo was taken a few days later. The water is clouded with silt from the runoff. It cleared in a short time.
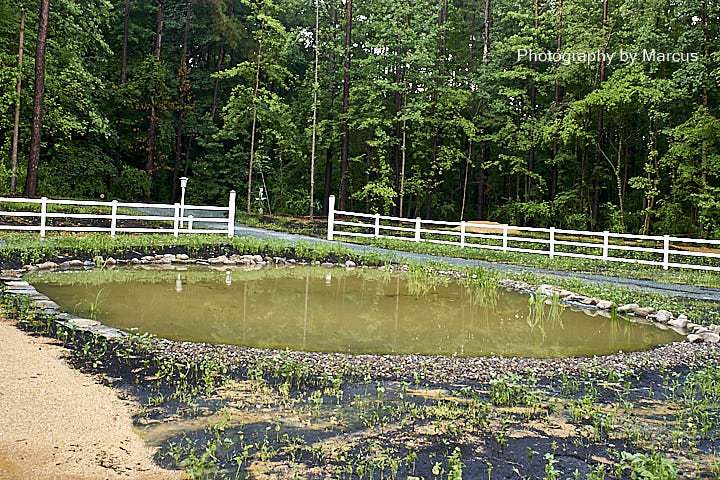
Fine Tuning
The landscaper had to go back to create the ledge for the rocks along the northern margin. He made the spillway into the bog area more restricted than planned, but because it was a matter of inches in elevation, it wasn’t evident until weeks later when the pond was filled and we started finishing the top edge. Considering that I was working from book knowledge and relying on work by those with limited experience in decorative ponds, it came out well. This fall after the cover crop dies back, I plan to rework that area so the liner will be better hidden.
Pond Plants
Nick encouraged me to check out Mellow Marsh Farm as a source for pond plants. It was great advice. They specialize in native species and have deep knowledge. I integrated their availability list with research I’d previously done and came up with a planting design.
I discounted the use of containers for anything but lilies and lotus. It would have taken a ridiculous number to fill the space. Instead, I decided to have the landscaper dump some of the dirt from the excavation back on the planting shelves. This strategy not only put the dirt to good use, it had the added advantage of being good for critters and creating an easy path for the initial plantings to fill out over time.
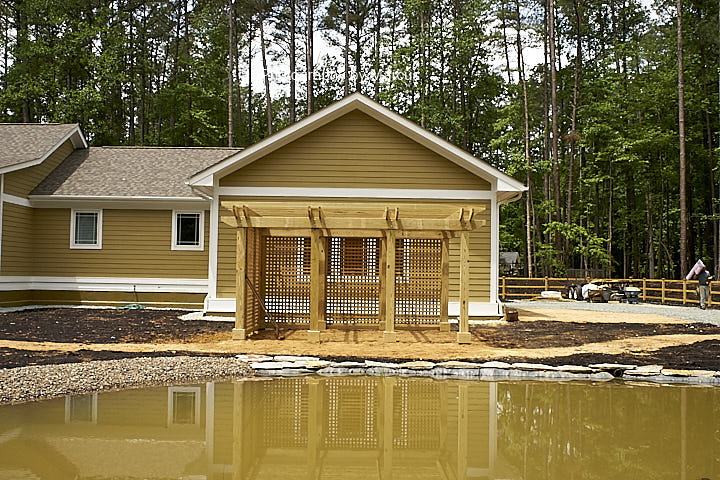
Pergola
The pond beckoned for an adjacent location for outdoor dining and relaxation. Since it gets the most sun light of any area in the yard, I couldn’t help but consider a pergola—as a sunshade and trellis to support some succulent vine like hardy kiwi. I wanted the structure to be attractive without stealing from the home. I came up with this design. It echoes Arts & Crafts in the beam end treatment and maximizes the available space while minimizing construction waste with standard length lumber. I decided to stain it the same color as the siding to further minimize visual competition.
Pergola construction, however, gave me another lesson in problem management. Somehow the simplicity of the design confused Rodrigo et al. Despite their mastery of the challenges of the house framing, they got flummoxed by the post notching. Their first effort generated three different patterns.
I watched some of the fiasco unfold from my workshop window. Although I went out a couple of times to question what was going on, I stopped short of interfering in Vernon’s domain. I should have called him right away. Instead, we had to do damage-control together the following morning. Fortunately, we were able to come up with a fix that only required one post replacement and some cosmetic inserts.
The area will be perfect for my old outdoor furniture. Although weathered, it’s made from tropical hardwood and will echo the Ipé decking. My next job is to refinish it. I decided to use the same formula as for the decks: Earthpaint Lime Clean, followed by sanding and Rainforest Sealer.